


News
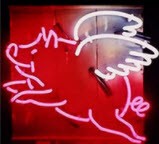
Making a Neon Sign
Making a Neon Sign
Lead glass is the most commonly used material in making a neon sign. Lead glass tubes that measure approximately 8-15 mm in diameter are heated in portions using many kinds of burners. These burners are chosen depending on the number of glasses to be heated for each mixture.
The burners have ribbon, cannon or crossfires and also a number of torches that work on a basic mixture of butane, propane or natural gas and air. An electrode is melted to each tip of the tube when it is done.
The electrodes are made of lead glass which has a little metal shell with two wires covering through the glass in which the wires of the sign will be connected.
All attachments should be seamlessly put together without any leaks before going to the next task. Then, the tube is put to a chamber which is connected to a well-made vacuum pump. The air in the neon tubes will then be removed. When removing the air, a high current is inserted through the tube through wires covering the electrode. This is called the bombarding process. The flow of electricity depends on the type of electrode used and the size of the tube. It is usually from 500mA to 1000mA level, at an applied voltage typically from 15,000 to 25,000V.
The bombarding transformer serves as an adaptable and steady electrical source. The length and pressure of the tube determine voltage being created. Basically the operator will regulate the pressure depending on the capacity of the bombarder to secure the loss of energy during the heat conversion process.
This sounds all high tech and complicated but nevertheless, this is how neon signs are made.

1. Electronic Power Supply
2. Neon Tube
3. Non-permanent Wall or Ceiling Hanging Chain
4. Bar Stock Frame With Window Bumpers
5. Electrode to Electrode Connection
6. Electrode to Transformer Connection
7. Neon Tube Support
8. Neon Tube "Bend Backs"
9. Three-prong Grounded Wall Plug
10. On / Off Switch
In a clear glass tube, argon gas gives off a steel blue light while neon gas produces red light. To create vivid designs, we can parlay the two base colors into over 80 different colors by using glass tubes that are coated in fluorescent powders. For instance, blue glowing argon gas in a yellow tube, emits a green light.
To shape the tubes, we use a glass blowing technique. Following a pattern drawn on a fire resistant sheet, we mark the tubes where we need to bend it. Then we heat each spot on a device called a ribbon burner which has a propane flame at 1200° F. Within about 30 seconds, the glass becomes soft enough to be pliable. We gently bend the tube, then blow air into the uncorked end to restore the original diameter. With each bend, we check the shape against the pattern.
After shaping we cut off the excess and remove any extra powder residue from inside of the tube ends. The next step is to attach the glass tube neon electrodes by fusing the two together with a propane hand torch and a flexible latex blowing tube. We seal the glass around one electrode and leave the other open. Then using a crossfire burner, we create a tubulation which is merely a bubble that can act as a passage way into the open electrode. We then fuse the tubulation to the open electrode. We now add a drop of mercury into the tubulation to brighten the color of the argon gas. Without the mercury, the argon gas would not be as bright. Neon gas (a red neon sign) does not need mercury.
Using whats known as an end torch, we fuse the open end of the tubulation to a long glass tube that leads to a pumping system. We connect the electrodes to the system and power it up. The pump vacuums out the air in the neon sign and injects the gas. The electrical current makes the atoms in the gas glow. To trap the gas inside the tube, we use the crossfire burner to remove the tubulation and seal off the open electrode, making sure the drop of mercury has fallen into the electrode first.
The next step is to dip the back of the neon sign into black paint which will help the lettering and design stand out. We use a brush to spread the coat evenly and remove the excess. We then light up the sign at high voltage for about 30 minutes. This will dry the paint but most importantly it will transform the liquid mercury into vapor which will spread through out the inside of the neon sign.
Using transparent clips, we mount the sign onto a black or clear plexiglass backing. Finally, we connect the protruding electrode wires to a neon transformer. A neon transformer converts the sta
The burners have ribbon, cannon or crossfires and also a number of torches that work on a basic mixture of butane, propane or natural gas and air. An electrode is melted to each tip of the tube when it is done.
The electrodes are made of lead glass which has a little metal shell with two wires covering through the glass in which the wires of the sign will be connected.
All attachments should be seamlessly put together without any leaks before going to the next task. Then, the tube is put to a chamber which is connected to a well-made vacuum pump. The air in the neon tubes will then be removed. When removing the air, a high current is inserted through the tube through wires covering the electrode. This is called the bombarding process. The flow of electricity depends on the type of electrode used and the size of the tube. It is usually from 500mA to 1000mA level, at an applied voltage typically from 15,000 to 25,000V.
The bombarding transformer serves as an adaptable and steady electrical source. The length and pressure of the tube determine voltage being created. Basically the operator will regulate the pressure depending on the capacity of the bombarder to secure the loss of energy during the heat conversion process.
This sounds all high tech and complicated but nevertheless, this is how neon signs are made.
Standard Components of a Neon Sign
1. Electronic Power Supply
2. Neon Tube
3. Non-permanent Wall or Ceiling Hanging Chain
4. Bar Stock Frame With Window Bumpers
5. Electrode to Electrode Connection
6. Electrode to Transformer Connection
7. Neon Tube Support
8. Neon Tube "Bend Backs"
9. Three-prong Grounded Wall Plug
10. On / Off Switch
How Neon Signs are Made
Neon signs are made of glass tubes bent into letters or shapes and filled with inert gas. When the electric current hits the electrodes in the tubes, electrons flow through the gas, making its atoms glow. The type of gas in the tubes, determine the color of the light.In a clear glass tube, argon gas gives off a steel blue light while neon gas produces red light. To create vivid designs, we can parlay the two base colors into over 80 different colors by using glass tubes that are coated in fluorescent powders. For instance, blue glowing argon gas in a yellow tube, emits a green light.
To shape the tubes, we use a glass blowing technique. Following a pattern drawn on a fire resistant sheet, we mark the tubes where we need to bend it. Then we heat each spot on a device called a ribbon burner which has a propane flame at 1200° F. Within about 30 seconds, the glass becomes soft enough to be pliable. We gently bend the tube, then blow air into the uncorked end to restore the original diameter. With each bend, we check the shape against the pattern.
After shaping we cut off the excess and remove any extra powder residue from inside of the tube ends. The next step is to attach the glass tube neon electrodes by fusing the two together with a propane hand torch and a flexible latex blowing tube. We seal the glass around one electrode and leave the other open. Then using a crossfire burner, we create a tubulation which is merely a bubble that can act as a passage way into the open electrode. We then fuse the tubulation to the open electrode. We now add a drop of mercury into the tubulation to brighten the color of the argon gas. Without the mercury, the argon gas would not be as bright. Neon gas (a red neon sign) does not need mercury.
Using whats known as an end torch, we fuse the open end of the tubulation to a long glass tube that leads to a pumping system. We connect the electrodes to the system and power it up. The pump vacuums out the air in the neon sign and injects the gas. The electrical current makes the atoms in the gas glow. To trap the gas inside the tube, we use the crossfire burner to remove the tubulation and seal off the open electrode, making sure the drop of mercury has fallen into the electrode first.
The next step is to dip the back of the neon sign into black paint which will help the lettering and design stand out. We use a brush to spread the coat evenly and remove the excess. We then light up the sign at high voltage for about 30 minutes. This will dry the paint but most importantly it will transform the liquid mercury into vapor which will spread through out the inside of the neon sign.
Using transparent clips, we mount the sign onto a black or clear plexiglass backing. Finally, we connect the protruding electrode wires to a neon transformer. A neon transformer converts the sta
By Julio Arzeno